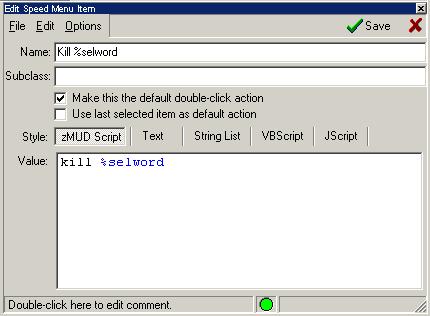
Speed Menu
This Settings Editor dialog page allows you to edit the properties of a Speed Menu item.

The Speed Menu is the menu that is displayed when you right-click on the output window. The Name field contains the name of the menu item. This value can contain variables or functions since it is parsed before being displayed in the popup menu. The Commands field gives the commands executed when this menu item is selected from the right-click menu.
To select a default item to execute when you double-right-click on the MUD window, select the "Make this the default" item. Otherwise you should select the "Use last selected item" to execute the last menu item selected when you double-right-click on the MUD window.
The %selline and %selword variables are very useful in the definition of menu items since they indicate the word and line that were right-clicked. For example, the definition:
kill %selword
will issue the kill command to the MUD along with the word you right clicked on. Thus, if you set this as the default action, and double-right-click on the name of a mob, that mob will be killed. This beats typing in the name of the mob.
If the Style is set to Script, the syntax editor will check the syntax and report any errors. If the Style is set to Text, you can edit the menu commands without performing any syntax checking. If Style is set to String List, you can easily edit a list of submenu items for this menu. Each command in the list will correspond to a string in the Caption string list. If Style is set to VBScript or JScript then the commands will be sent to that script processor. Note: VBScript an JScript use the #SS command internally, if you change to another style you will have to remove that change manually.
Submenus
To add an entire submenu to a menu, there are two methods. First, you can simply use a string list to define the different captions and commands for the menu. The first caption in the string list will be the menu caption. The other captions in the list will be the captions of the submenu items. For example, the caption:
will define a menu item called "Sort". This menu will contain a submenu with the two items: "First Name" and "Last Name". If the Script command was
then the command "do first name" would get executed when the "First Name" item was selected, and the "do last name" command would get executed when the "Last Name" item was selected.
Instead of using a string list in the command field, you can define a common command for all items in the submenu. You can use the system variable %caption to refer to the caption of the item selected. For example, the command
would display "First Name was selected" if the First Name item was selected in the submenu.
Menu Classes
The second and more flexible way to define submenus is using a menu class. A menu class is a special class folder that is marked to contain a submenu.
Normally, zMUD searches through all enabled classes folders and puts all of the menu items that it finds into the popup menu. However, when zMUD sees a class marked as a Submenu (changed in the Editor for the class folder itself), zMUD skips that folder and does not include the items that are contained within it. Only when zMUD gets to a menu item that gives the name of the folder in the Subclass field does zMUD then retrieve the menu items stored in that folder.
So, for example, let's say you have the following:
Class: Main
Menu item: Item 1
Menu item: Item 2
Class: Combat
Menu item: Item 3
Menu item: Item 4
If the class Main and the class Combat are both enabled, the right-click popup menu will contain Item1, Item2, Item3, and Item4. If you disable the Combat class (using #T- Combat), then the popup menu would only contain Item1 and Item2.
Now, let's say you enable both classes, but you mark the Combat class as a Submenu class. Now the popup menu will only display Item1 and Item2, whether or not the Combat class is enabled or disabled.
Next, if you go to Item 2 and enter "Combat" for the subclass name, you'll now get a popup menu with Item1 and Item2, but Item2 will be shown as a submenu. When you select Item2 you'll see the submenu with Item3 and Item4 in it.
Using this flexible method of creating menu classes, you can have as many nested levels of menus as you want.


 |