Creating a Database
A Database is created by telling zMUD what information is to be stored for each object. For example, if you are creating an equipment database, you want to store the name of the item, perhaps the item cost and weight, and any special attributes such as whether the item adds to your hitpoints or strength. If you are creating a monster database, you want to store the name of the monster, its level, how many hitpoints it has, and how much damage it inflicts. You must decide what information you want to store in your own database. Don't worry though, you can always add more information to a database later if you forget something.
Each item is stored in a database "record". The pieces of information stored for each item are called "fields". For example, in the equipment database, each piece of equipment is a record, and the fields are the Name, Cost, Weight, etc for the item. The information about the Fields in the database are stored in the database Definition File and has a file extension of .dbd. The actual data for each record in the database is stored in a separate Data File which has a file extension of .db. These two files are separated to keep the structure of a database separate from the actual data. This lets you add or remove fields in the future without having to start over entering the data. It also allows you to share your database structure with other zMUD users without sharing the specific data.
Database Window Overview
To open the Database window, click the DB button on the main zMUD toobar, or select Database from the Windows menu. The database window will open and prompt you to create a New database, or Open an existing database. Along the top of the window is the menu bar, and beneath that is a toolbar. You can change the properties of the toolbar by right-clicking on it. Beneath the toolbar is a selection box for the database you wish to view when multiple databases are open. To the right of the database selector is an area for window tabs to select different database Views. A database View is a way of looking at a subset of your database, sorted in a particular way, so you don't have to always look at the entire database at once. Beneath the View tabs is the main portion of the window where the data is actually displayed.
Creating a New Database
To create a New database, click the New button or select New from the File menu. You will be prompted to enter the Name of the database, the Filename to store the database in, and what Template you want to create the database using. The Name of the database can contain spaces or any other letters to remind you what is stored in the database. The Filename will usually be created automatically based upon the database name that you use.
To help you create new databases quickly, several templates have been supplied with zMUD. The templates include an equipment database, a monster database, and a character database. You can select one of these templates that closely matches the type of database you are creating, or you can just select the Blank template to start from scratch. Once you create your own database, you can save it as a template yourself by selecting the Save As Template option in the File/Save As menu command.
Creating Fields
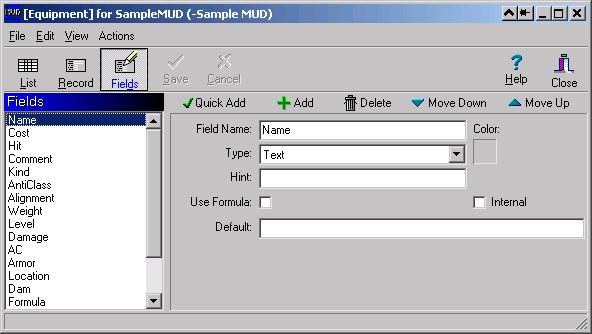
When you create a New database, you will automatically be placed into the Field editor. You can also select the field editor at any time by clicking the Fields button in the toolbar. The fields editor allows you to define the types of information you want to store for each database item. There are several different Types of fields that can be used for storing different information. The available field types include:
Text a single line of text
Memo multiple lines of text
Number a number in a given range with several formatting options
Single Option a single value out of a list of possible values
Option List multiple values from a list of possible values
Zone a list of map zones from the automapper module
Room a list of map rooms from the automapper module
Record points to another record in this database or another database
Boolean a true/false or yes/no field that can be formatted different ways
Each field has a Name, a Type from the above list, a Color for the field to be displayed in, an Internal flag, and an optional Formula. Formulas are described in the Advanced Database topic. The Internal flag is used to prevent the value of the field from being returned to the zMUD scripting language.
The Hint field is used to describe the field. This text is displayed in the status bar when the user enters data into this field.
In addition, each field requires other information depending upon what Type of field it is. For example, a Text field can have a default value. A Number field has a default, along with a minimum and maximum value. The Single Option and Option List types allow you to define the list of possible values the field can contain and you can indicate if additional values outside the list can be added by the user later.
Numbers can be formatted in several different ways for output to the screen. You can select a format of General (the default), Currency (with a dollar sign and commas), Commas (like General but adds commas between thousands), and Plus/Minus (places a + or - in front of the number depending on if it is positive or negative). These formats only control how the number is displayed for output. You always enter numbers in General format.
Option Lists
Fields with a type of Single Option or Option List need a list of possible values to be entered. If you want to allow additional values for these fields as needed, click the Allow Other option. Otherwise, only the values that you list will be allowed in the field. To add values to the allowed list, click the Add button next to the list. Enter the name of the value to be added. You can enter multiple values at the same time by putting commas between the values. Also, if you paste into this field, any newlines or tabs are also replaced with commas, so you can select a row or column of values in a spreadsheet like Excel and paste them into the Add box.
To delete values from the list, select the value by clicking on it, then click the Delete button to the right of the list. To edit the name of the value, select the value by clicking on it, then click the Edit button.
You can mark values as the default value for the field by clicking the checkbox to the left of each value. A Single Option field is only allowed to have a single default value, but an Option list can have as many default values as you need.
Adding Fields
To add a field, click the Add button. A new, blank field will be created, and you then need to enter the Name of the field, the Type, and enter any other information required. Instead of creating fields from scratch, you can select from several pre-defined fields using the Quick Add button. Click Quick Add and a list of pre-defined fields will be displayed. Select the one you want and click OK. You can then modify the field if it needs to be changed slightly. Pre-defined fields are stored in the TEMPLATES.DBD database definition file which you are free to open and edit to add new fields or to change the existing pre-defined fields. Be sure and backup any changes made to this file in case it is overwritten in the future when you upgrade zMUD.
Deleting Fields
If you no longer want a field, you can delete it using the Delete button. Be very careful, however, since all data stored in the database for that field is lost and cannot be recovered. While you can "Exit Without Saving" from the database if you make a mistake, zMUD autosaves the database every 5 minutes by default, so be very careful deleting fields.
Rearranging Fields
The list of fields shown on the left are the fields for your database and the order that they were created in. By default, the data stored for each record will be stored in the order that is shown. While this order normally doesn't make any difference, you can rearrange the order of the fields using the Move Up and Move Down buttons in the toolbar. This will change the order that the fields are saved when the database is next saved.
Saving your Fields
When you are done creating the fields for your database, save your database definition by using the Save command in the File menu. You should always save your work periodically although by default zMUD will autosave your database every 5 minutes. You can change or disable the autosave function in the Logging Preferences page.
Once you have saved your field definitions, click the List button in the toolbar to display the main database screen so you can create some Database Views and then Enter your Data.


 |